Wood Crafters Resource
Your Wood Crafting Hobby and Business Resource


Joinery - Easy Joinery With Pocket Screws
What is Pocket Screw Joinery?
Pocket Screw joinery is a quick and easy woodworking joint that comes in handy in many projects. The best way to describe the pocket screw joint is as an enhanced version of the traditional butt joint. Here, a screw is added to the butt joint via a pocket hole drilled into one of the pieces. The screw essentially acts as the clamping force that keeps the butt joint together.
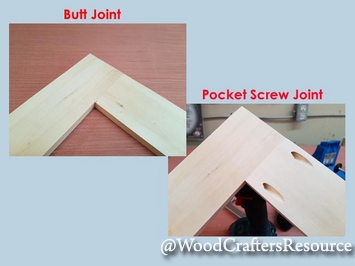
Table of Contents
How does Pocket Screw Joinery work?
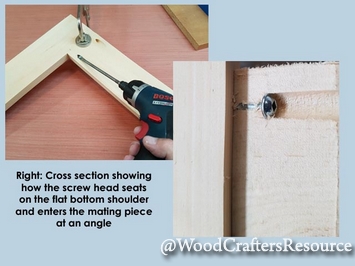
Although sometimes performed free-hand by seasoned woodworkers, a jig is most often used to control the angle and depth at which the pocket hole is made. The hole is drilled with a stepped counter bore drill bit that creates a narrow hole for the screw shank as well as a flat bottomed shoulder for the screw head to seat against. The angle at which the hole is drilled is typically 15 degrees. Once a screw is inserted into the drilled hole and into it's mating wood piece, the screw essentially acts as a clamp keeping the wood pieces together.
The clamping force of the screw is what distinguishes this joint from other traditional woodworking joints that typically count on glue and intricate mechanisms to mate the wood pieces together. The speed at which the pocket hole joint can be made and it's relative strength make it an attractive option for wood joints.
How strong is Pocket Screw Joinery?
When compared to using dowels or moritse and tenon joinery, pocket hole joinery is considered to be the least strong of the 3. Some tests have shown that a pocket hole joint can withstand forces of up to 100 pounds. Although this would not be strong enough to be used in projects where the joint would be subjected to higher forces, such as in benches,, there is still a valuable place for this kind of joinery in your projects.
Pocket Screw Joinery used in combination with other joinery types:
Oftentimes, pocket hole joinery is selected for components of a more complex project that may consist of other more elaborate joinery options.
Typical uses of the pocket hole joint:
- Used extensively in face frame construction
- Table aprons to attach tabletops
- Drawer box construction
- Utility cabinets
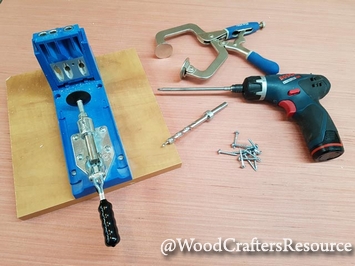
Equipment needed
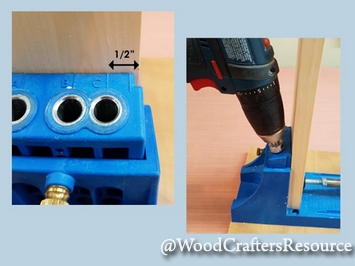
- Jig that controls drilling angle and depth (Kreg Jig Pocket-Hole Jig System used in this article)
- Stepped counter bore drill bit
- Pocket hole screws
- Driver
- Clamp (optional - used to hold the pieces in place while driving the screws - Kreg 2.75-in Face Clamp shown)
Planning and assembly
Avoiding end grain
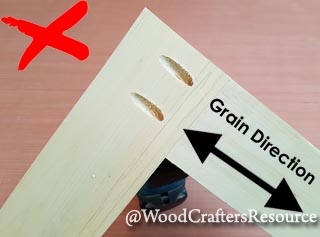
You should always avoid screwing into the end grain of the mating piece. Since the fibers of end grain would run parallel to the screw, it provides the screw with less 'bite' causing the joint to be weaker. So, always try to drive your screw into the edge grain of the piece you are joining to.
Deciding where to drill the pocket holes
Because of the unsightly holes created for a pocket hole joint, you must decide if these holes will be concealed by:
- Other components of the project such as moldings, framework or cabinet carcass
- Will be used on the interior of a project such as case work or face frames and will be less visible
- Will be made in the visible side of the finished project and concealed with plugs
- Or whether the holes will be concealed at all
Marking your pieces
Once you have decided on how you'll deal with the pocket holes, orient your pieces to be marked accordingly. In most cases, you would be marking and drilling on the opposite side of the pieces being joined.
As with all woodworking joints, it is recommended that you mark the pieces to be joined in their planned respective places. You should also mark the places where the pocket holes are to be drilled. You usually need at least 2 pocket screws per joint to prevent you parts from twisting.
We recommend that you drill your pocket hole at least 1/2 inch from the edge of the board. This will prevent the drill bit from blowing out through the edge of the board.
Drilling the pocket holes
Once the pieces have been marked, it is time to use the jig and drill out the pocket holes in the locations you previously marked..
As you drill these out, periodically clear out any accumulated wood chips by pulling the bit out slightly to prevent clogging and unnecessary friction on the drill bit that could lead to the dulling of the bit.
Applying glue (or not)
Although adding glue to the joint is not mandatory, it does add some strength to the joint and helps keep the joint tight during seasonal wood movement. Manufactured sheet materials such as plywood are less affected by wood movement and can therefore go without glue.
Since it is likely that at least one of the two pieces of lumber you are joining is end grain, it is important to saturate the end grain with glue to increase adherence. You can either push glue into the end grain with your finger, or dilute some of the glue with water to make absorption into the end grain fibers more effective.
Selecting the right type of screws
The type of screws you use can also determine if your joint will be at it's best.
Since the pocket hole that is drilled produces a flat bottom shoulder for the the screw head to seat, it is best to use a screw that has a flat bottom to it's head. This type of screw produces the most clamping pressure without splitting the wood. The cone shape on the head of a typical woodworking screw would act as wedge against the shoulder eventually causing the wood to split.
Washer head - The washer head screw is the most often used pocket hole fastener which has the wider flat area of the head for superior clamping pressure on the joint.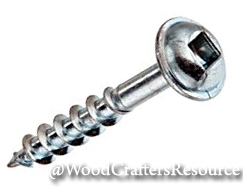
Pan head type - The pan head screw has a slightly narrower screw shank and is best used in thin hard woods. The smaller shank diameter prevents splitting in these materials.

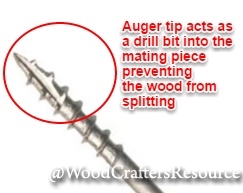
Self tapping - Since only the piece of wood that has the pocket hole is drilled, the self tapping feature typically found in pocket hole screws allows the screw to bore it's way into the mating piece of wood. This ensures that the screw enters exactly where it is needed and also prevents the wood from splitting due to the boring effect of the screw.
Coarse threaded - Coarse threaded screws are used mostly in softwoods and plywood. The threads of these screws provide more bite into these materials resulting in a stronger joint. Since plywood often has poplar at it's core, the coarse screw is well suited for this material. (Woodworkers have had varying degrees of success using pocket hole joinery with MDF. Since the core of MDF is typically softer than most other wood-based materials, pocket hole screws tend to fail more easily. As a general rule, we would suggest that you try some test pieces to see if pocket hole joinery is suitable for your particular application.)
Fine threaded - Are used mainly in hardwoods. Since the density of hardwoods is much higher than softwoods, the fine thread screws are easier to drive into those materials. The use of pan head screws (in thinner materials) is recommended. Fine thread screws would easily strip from plywood due to the limited holding power of the thread design.
Pocket Screw usage guide

Assembling:
Applying the glue - if you want to add glue to your joint to reinforce it, always make sure the piece with the end grain is prepared in such a way as to not allow it to drink up the glue resulting in a weakened joint. This can be done by first applying a 'sizing' mixture of one to two parts of water to 1 part of glue. This basically acts as a primer for the glue and improves the bond.
Clamping the pieces together - It is not uncommon for the 2 pieces being joined to move slightly as you screw the joint together. Applying a clamp to the joint before driving in the screws ensures that the pieces stay aligned. (Kreg 2.75-in Face Clamp shown here)

Applying the screws - When using washer type screws, once the head reaches the flat bottomed shoulder you drilled out, only a modest amount of torque is needed to secure the joint. Be careful not to over-tighten the screw. Some powered drivers can exert significant force on the screw which could damage the joint.
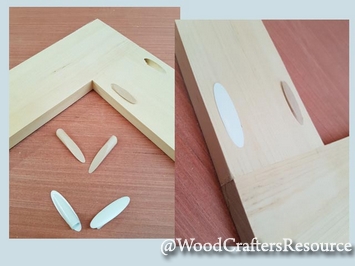
Hiding the pocket holes - If the pocket holes need to be concealed with plugs, keep in mind that for these plugs to be fairly inconspicuous, they should be of the same material as the pieces being joined. Nevertheless, these plugs often end up showing end grain which can absorb stain and finish differently than edge grain making it difficult to hide them completely. For painted projects, this becomes less of an issue.
The wood plugs require some sanding after being glued into place. The white plastic plugs are surface mounted and sit slightly proud above the wood surface. These act more likw caps rather than traditional plugs.
Making your own pocket screw hole plugs
For those of you who might need an extensive number of plugs or can't find any ready-made plugs made from the same wood species as your project, you have the option to make your own. Krek Tools offers a jig and bit kit that allows you to do just that.

